A few months ago, I wanted to host files stored on a portable hard disk on the
public internet. These files were just some photos and videos that I wanted to
share with some of my cousins. Nothing fancy, just a webdav server using
rclone would
suffice—a very ad-hoc setup as you can see. I wanted it to be reachable
at share.prithu.dev to give it a short and friendly rememberable name. I used
the RPi 4 to be the host machine, attached the hard drive to one of it’s usb
ports, mount’d the drive at /mount/hdd and ran:
rclone serve webdav --user foo --pass secret --addr 0.0.0.0:8080 /mount/hdd/shared-dir
This is simple enough. Now, all I need to do is, using port-forwarding rules on
my router, expose this port to the world and point share.prithu.dev to my
home IP address, and bob’s your uncle … or is he? Well, the glaring problem
here is me exposing my home IP address—which is, to say the least, a bad
practice and something that I want to avoid. Also, there’s the problem of
dynamic IP of home broadband, but that’s a fairly easy problem to solve by
writing a script to update the DNS records every X minutes.1
Another solution is I can use one of my VPSs with a static public IP as a proxy
between the RPi and the internet—effectively hiding my home IP from the
internet. I will also not have to worry about the changing home IP. One way to
do this is using good ol’ ssh tunnels (port forwarding) and forward the remote
port to my RPi. In my experience however, I have found ssh tunnels to be a
little unreliable, especially when it comes to spotty home broadband
connection, due to which the connection breaks and you will have to either
restart the client or write a script or a service to restart the client
automatically. SSH tunnels are good for quick one-off tasks though. They can be
a life saver—that is, If you can remember the right syntax of -R and -L
options without referring to the man page (now that’s a challenge!). I wanted
the server to be reliably hosted for as long as it was required with minimum to
no maintenance from my side. So, I thought to try my hands on wireguard with
NAT on the VPS. The idea is to make the VPS act as a relay server which routes
packets to the RPi (sort of like “your router in the cloud” if you
will)—while the RPi server only being reachable from within the wireguard
network.
The final setup
This is how the final setup is going to be:
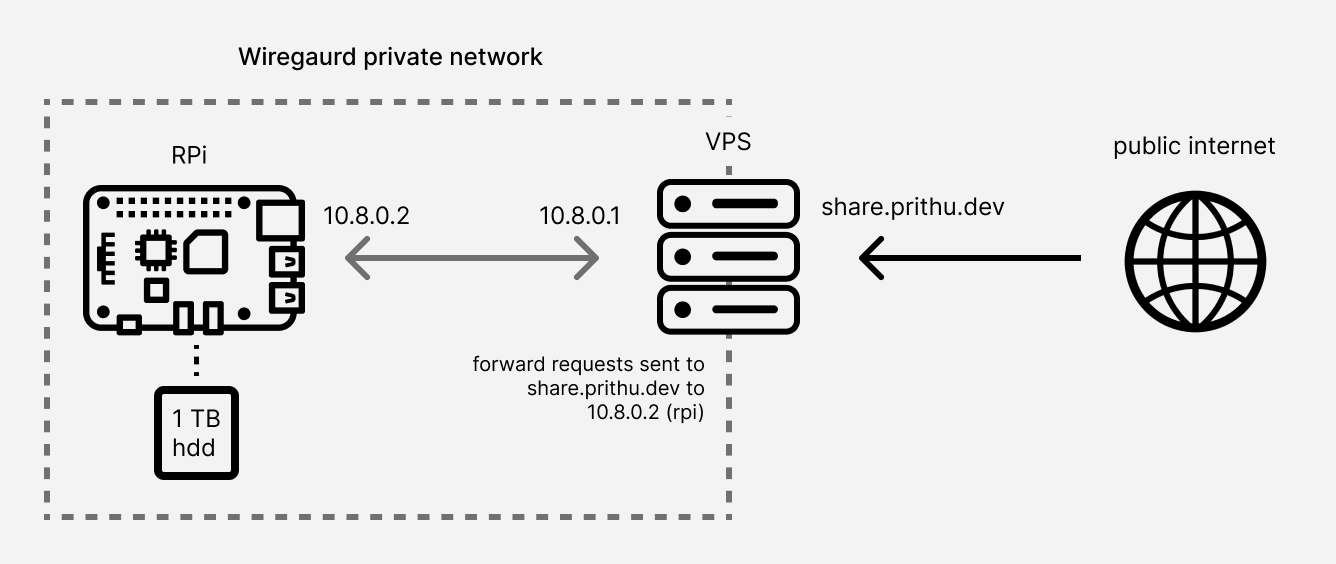
Here’s the wireguard network consisting of the RPi and VPS. The devices are
assigned private IP addresses in the subnet of 10.8.0.0/24.
Setting up the wireguard network
Wireguard makes it super simple to setup a VPN. In fact, it’s one of its aims to be as easy to setup as SSH:
WireGuard aims to be as easy to configure and deploy as SSH. A VPN connection is made simply by exchanging very simple public keys – exactly like exchanging SSH keys …
I’ll try to be brief with this part, at the same time, try explaining most of it (for documentation sake for my future self) but more info can be found in this excellent resource: unoffical wireguard doc.
1. Install wireguard. Wireguard is available pretty much everywhere. You can also compile it from source. The instructions on the website are pretty straight forward and easy to follow. On my ubuntu VPS (and the RPi) it’s just:
$ sudo apt install wireguard
2. Generate the key pair. Wireguard works with simple public-private key
pairs—just like ssh. Each peer in the wireguard network has a public key
associated with it. The wg utility is used to generate these key pairs:
umask 077
wg genkey | tee privatekey | wg pubkey > publickey
3. Configure wireguard. The configuration file for a network is located at
/etc/wireguard/*.conf by default. You can setup and configure multiple
wireguard networks—each having it’s own *.conf file. For example for a
network called wg0, the config file is /etc/wireguard/wg0.conf.
-
On the VPS
[Interface] Address = 10.8.0.1/24 ListenPort = 42069 PrivateKey = <privatekey of VPS> [Peer] PublicKey = <publickey of RPi> AllowedIPs = 10.8.0.2/32 # Peer 2 for example [Peer] PublicKey = <publickey of peer 2> AllowedIPs = 10.8.0.3/32Addressis the IP address associated with the VPS in the network. and the/24suffix means that the VPS can also route traffic not just for itself but also for the whole range of10.8.0.0/24. The VPS is essentially performing the role of a bounce server that routes traffic to/from all the other peers in the network.ListenPortis the port it listens on for connections from peers. This port needs to be publicly reachable, hence punch a hole through the firewall and update the networking security rules of the VPS (something that is easily forgotten).PrivateKeyis the contents of theprivatekeyfile.Each
[Peer]section defines a peer in the network.PublicKeyis the public key of the peer—in this case, the RPi’spublickeyfile.AllowedIPsis simply the IP address range the peer will route traffic for. In this case, it’s a single IP—indicated by the/32suffix—of10.8.0.2. This will be the address of the RPi within the network. More[Peer]sections can be added to add hosts to the network and they’ll all be able to reach each other by routing traffic through the bounce server—forming a virtual mesh network. -
On the RRi
[Interface] Address = 10.8.0.2/32 PrivateKey = <privatekey of RPi> [Peer] PublicKey = <publickey of VPS> AllowedIPs = 10.8.0.1/24 Endpoint = 203.0.113.42:42069 PersistentKeepalive = 25Addressis the IP address that the RPi associates itself within the network. Note the/32suffix means that only a single IP is associated with this host. It tells the network, not a range, but a single IP is reachable by this node.PrivateKeyis the contents of theprivatekeyfile generated on the RPi. The[Peer]section here represents the bounce server (the VPS).PublicKeyis thepublickeyof the VPS.Endpointis the publicly reachable IP and port of the peer—this is the public IP of the VPS and theListenPortfrom the config on the VPS.PersistentKeepaliveis required for peers behind a typical home router performing NAT. It keeps the connection open in order to be able to receive incoming packets even after a long interval of inactivity.2
4. Start wireguard.
sudo wg-quick up wg0
This will bring up the wg0 network interface and setup the link. You can also
use the systemd service file that comes with the package:
sudo systemctl start wg-quick@wg0
Run wg to see if everything is working as expected.
prithu@rpi:~ $ sudo wg
interface: wg0
 public key: SomePublickeyForRPi6VzxPWt8sdIj8rkjmzMsxjm8=
 private key: (hidden)
 listening port: 52912

peer: SomePublicKeyForVPS+px4kBLmGzIrBra2K2Rc3yCw=
 endpoint: 203.0.113.42:42069
 allowed ips: 10.8.0.0/24
 latest handshake: 27 seconds ago
 transfer: 265.41 MiB received, 256.75 MiB sent
 persistent keepalive: every 25 seconds
The RPi should be reachable at 10.8.0.2 from the VPS and the VPS at
10.8.0.1 from the RPi. You should be able ping the other machine to test
the connection.
Forwarding packets from the VPS
Now that I have the RPi and the VPS in the same wireguard network, I just need
to forward traffic hitting port 80 on the VPS to port 8080 on my RPi, where
the rclone process is listening on. I could simply use a reverse proxy like
nginx or haproxy, but I wanted to make this a learning opportunity and go a
level lower, closer to the networking stack and try using iptables and it’s
NAT capabilities.
A little about iptables
iptables uses netfilter underneath which is a
framework for packet filtering, mangling, rate limiting, logging and lots
more, baked right into the Linux kernel. Netfilter is a kernel-space program
and exposes hooks that let you interact with network packets and perform
actions on them. iptables is an easy to use user-space utility that provides
an interface to netfilter and let’s you create rules and actions that let you
control the fate of each packet that enters or leaves the host. Here’s an
excellent
article
I referred that goes through the architecture of netfilter and iptables. There
are myriad of articles and guides explaining how to use iptables and its syntax
of rule-specifications; so I am not going into detail on that.
NAT’ing the packets
First, lets setup rules in the PREROUTING and POSTROUTING chain in the
nat table. PREROUTING chain in the nat table gives us access to the
DNAT jump target that let’s you change the destination of a packet entering
the host. Similarly, POSTROUTING chain in the nat table gives us access to
the SNAT jump target that lets you change the source of the packet leaving
the host.
sudo iptables -t nat -A PREROUTING -i ens3 -p tcp --dport 80 -j DNAT --to-destination 10.8.0.2:8080
sudo iptables -t nat -A POSTROUTING -o wg0 -p tcp -d 10.8.0.2 --dport 8080 -j SNAT --to-source 10.8.0.1
The first rule changes the destination address of every TCP packet (-p tcp)
hitting port 80 (--dport 80) on the host to 10.8.0.2 and the port to
8080. The -i ens3 specifies the interface for the rule, which is the public
interface of the VPS. Before the packet leaves the VPS destined to the RPi (-d 10.8.0.2 --dport 8080), the second rule changes its source address to the
address of the VPS in the wireguard network (10.8.0.1). This is so that the
RPi replies back to the VPS instead of replying to the original client’s
address. The -o wg0 argument specifies the rule to be applied only for
packets going out through wg0 wireguard interface.
Note on MASQUERADE
MASQUERADE is a special target that is only available in the POSTROUTING
chain of the nat table. It’s a specialized case of SNAT target and
according to the docs it should only be used for dynamically-assigned IP
addresses. i.e if the interface goes down and comes back up with a new IP. In
our case though we have a static IP (10.8.0.1) assigned to the host. I am
sure there are good reasons why not use it if you already have a static ip
assigned and don’t expect it to change; iptables might be performing extra
steps for MASQUERADE targets thus might add some overhead. However, you could
use it with static IP if you are okay with the added overhead. If we were to
use MASQUERADE though, we would not have to mention --to-source argument from
the POSTROUTING rule above.
sudo iptables -t nat -A POSTROUTING -o wg0 -j SNAT MASQURADE
Allowing packets to be forwarded
After being processed by the PREROUTING chain the packet goes through the
FORWARD chain. Here’s what the sequence looks like:
        .------------.    .---------.    .-------------.
ens3--->| PREROUTING +--->| FORWARD +--->| POSTROUTING +---> wg0 (to rpi)
        '------------'    '---------'    '-------------'
Usually the default policy of the FORWARD chain is to DROP the packet. We
need to allow packets to be forwarded. The following two rules allow packets to
be forwarded across the two interfaces:
sudo iptables -A FORWARD -i ens3 -o wg0 -j ACCEPT
sudo iptables -A FORWARD -o wg0 -i ens3 -j ACCEPT
Although the above rules work fine, I could be more specific by including the destination address, port and protocol—making sure we only allow the traffic we want to forward—as a good security measure. But since this is a personal VPS, I don’t mind being a little lax with the rules. Here are more specific rules we can use instead:
sudo iptables -A FORWARD -i ens3 -o wg0 -d 10.8.0.2 -p tcp --dport 8080 -m conntrack --ctstate NEW -j ACCEPT
sudo iptables -A FORWARD -i ens3 -o wg0 -m conntrack --ctstate ESTABLISHED,RELATED -j ACCEPT
sudo iptables -A FORWARD -i wg0 -o ens3 -m conntrack --ctstate ESTABLISHED,RELATED -j ACCEPT
conntrack allows us to use the --ctstate NEW option to allow new
connections through at first. Next we use the ESTABLISHED and RELATED to
allow any packets that are part of an already established or related
connection.
Almost forgot—we need to also enable traffic forwarding at the kernel level by
enabling the net.ipv4.ip_forward kernel parameter, which is disabled by
default.
sysctl -w net.ipv4.ip_forward=1
# to persist across reboot
echo "net.ipv4.ip_forward=1" >> /etc/sysctl.conf
That’s it! Now, all I need to make sure is that port 80 is reachable on the
VPS and point share.prithu.dev to the VPS’s public IP. Visiting
http://share.prithu.dev will render the rclone webdav server’s directory
listing page.
I can use this setup for various other self-hosting projects in the
future—especially when I want to make sure I have the physical access to the
machine providing the service. Forwarding more ports/protocol can be done
simply by copying the same rules (PREROUTING, POSTROUTING) from above and
changing the --dport and -p arguments accordingly and making sure they are
allowed in the FORWARD chain. All in all, this was a good learning
opportunity—especially learning about netfilter and iptables. I thought
iptables was just used as a firewall, while it’s a lot more than just that
and is a pretty versatile tool. While learning about iptables I also came
across nftables which
is a modern successor of iptables which is more flexible and performant.
Uninterupted Power Supply for the RPi
One last thing to add is an UPS. The RPi was powered by an AC adapter, which is not ideal if you are running it as a server since power outages may cause uptime disruptions, even worse, disk corruptions—not something we want while running a server. In order to prevent that, I ordered this micro-UPS to keep my RPi up for enough time until power came back on. This UPS has the correct rating (5V 3A) required for the RPi and has a capacity of 7500 mAh. The UPS seamlessly switches over to battery power without disrupting the Pi. It’s a life saver and keeps the RPi up reliably during outages.
-
something like this script ↩︎